Unlocking the Power of Seamless Donations: Simplify Giving for Your Nonprofit

Introduction
I have recently developed and deployed a new WordPress website for a small nonprofit in the Philippines (https://waaccaph.org). They need a simple, customizable donation platform that will work with their PayPal account, with no platform fees, but with recurring donations.
The only solution that I found that addresses all their needs and more, is with Seamless Donations.
In today’s digital age, online donations have become essential for nonprofits, charities, and even individuals seeking financial support for a cause. To make the process of collecting donations easier and more efficient, many organizations especially the startup ones have turned to free WordPress plugins that are feature-rich. One such powerful tool is the Seamless Donations Plugin.
In this blog post, we will explore the Seamless Donations Plugin, its features, drawbacks, and how to implement and test the plugin. The good news is that Seamless Donations is a “freemium” WordPress product, which means that it offers either paid add-ons or a premium version in addition to its free version.
What is the Seamless Donations Plugin?
The Seamless Donations plugin is a feature-rich and user-friendly WordPress extension developed by ZATZLabs and designed specifically for nonprofits. It enables organizations to integrate donation forms into their websites seamlessly, allowing supporters to contribute funds quickly, securely, and easily. Its zero platform fee separates it from the other donation platforms I have seen, which is crucial for starting nonprofits.
Key Features of Seamless Donations Plugin
Ease of Installation and Setup: Setting up Seamless Donations on your WordPress website is a breeze. I will walk you through the steps from using the donation shortcode to configuring the donation form.
Multiple Payment Gateways: Seamless Donations supports two major payment gateways: PayPal and Stripe. This flexibility ensures that donors can contribute using their preferred payment method, enhancing the user experience.
Recurring Donations: Enable recurring donations to encourage long-term support for your cause. Donors can set up automatic contributions, simplifying the donation process for them while ensuring a steady stream of income for your organization.
Donor Management: This allows you to view donor information and donation history on the WordPress dashboard.
Customizable Donation Form: This allows you to easily customize what features, fields, or sections go on the donation form.
Donation Tracking: Monitor donations in real-time and keep a record of all transactions. This helps maintain transparency and ensures accuracy.
Designated Funds Set Up: This important feature allows you to set up multiple funds that will allow your supporters to pick a designated fund to which they want their donations to go.
Email Notifications: Stay informed about new donations and donor activity through email notifications. This feature ensures that you can promptly acknowledge and thank your supporters for their contributions. The thank-you default templates for recurring donations, anonymous, tribute gifts, employer matches, etc. can be customized to your needs.
Integration with WordPress Themes: Seamless Donations integrates seamlessly with most WordPress themes, ensuring that your donation forms blend seamlessly into your website’s design.
Some Minor Drawbacks
As expected with every free plugin, there are potentially some drawbacks. But this plugin’s case is minor and can be resolved with some paid add-ons that will not break the bank. Here are a few that I have found:
- Deletion of funds, donors, and donations – You cannot delete any of these on the dashboard unless you purchase their ‘Delete Monster’ add-on. However, with funds, the way to resolve this without purchasing their add-on is by configuring the fund not to display on the form.
- Limited form customization – You get a basic form that can easily be customized using some custom CSS that you can add to the Customizer. You may purchase their premium colorful/beautiful donation forms add-on for $20-30 per single site.
- Giving level management – At the time of this writing, there are 6 fixed giving level amounts. But this is resolved by putting in a specific or other amount as an option. They offer a paid-on called the Giving Level Manager for $19.95 per single site.
Steps to Implement the Seamless Donation Plugin with PayPal
After installing and activating the plugin, head to your WordPress dashboard and click on the Seamless Donations link on the left navigation.
You will then be presented with the following 8 tabs:

1. The Seamless Donations tab shows a getting started video by the developer himself, an email subscription to stay up to date, the shortcode to use on a page or post, plus links and resources about the plugin.
2. The Thank You Templates tab allows you to customize the content that appears with the email notifications sent after a donation. You may include placeholders for first name, last name, amount, fund, etc.
3. The Thank You Page tab enables you to configure a special thank you message that appears on the screen after the donors complete their donations. This is not the same message that gets emailed to the donors. That is found in the Thank You Templates.
4. The Form Options tab is where the Giving Levels, Form Styles, Currency, and features to show or hide on the form.
- Giving Levels – 6 levels are available for selection (5, 10, 50, 100, 500, 10000). Aside from these amounts, an ‘Other Amount’ check box will display on the form; if that is ticked, the donor may enter the amount of his choice.
- Form Styles – 3 options are available: Classic, Modern, and None. These options are very basic, and if you want more designs, they may be purchased as an add-on.
- Currency – This is where you select the currency you would like to receive donations in and the default country for the donation form.
- Form Fields and Sections – This is where you will either Show/Hide the checkboxes for these features: Designated Funds, Repeating Donation, Tribute Gift, Employer Match, Donor Telephone Field, Donor Employee Field, Donor Address Section, Donor Occupation Field, Mailing List, and Anonymous Donation.
5. The Add-ons tab is the plugin’s premium add-ons such as the Giving Level Manager, Add a Note, Donors Pay Fees, Thank You Enhanced, Beautiful Donation Forms, Colorful Donation Forms, Basic Widget Pack, Delete Monster, etc.
6. The Settings tab is divided into multiple sections.
The first section is the Basic Settings where you enter information about the organization, the notification email addresses, the payment gateway of your choice (PayPal or Stripe), and the Donor Fee Payment. The default is the donor never pays gateway fees. But if you want to give the donors an option to pay their donation processing fees, you may purchase their Donor Pay Fees add-on.
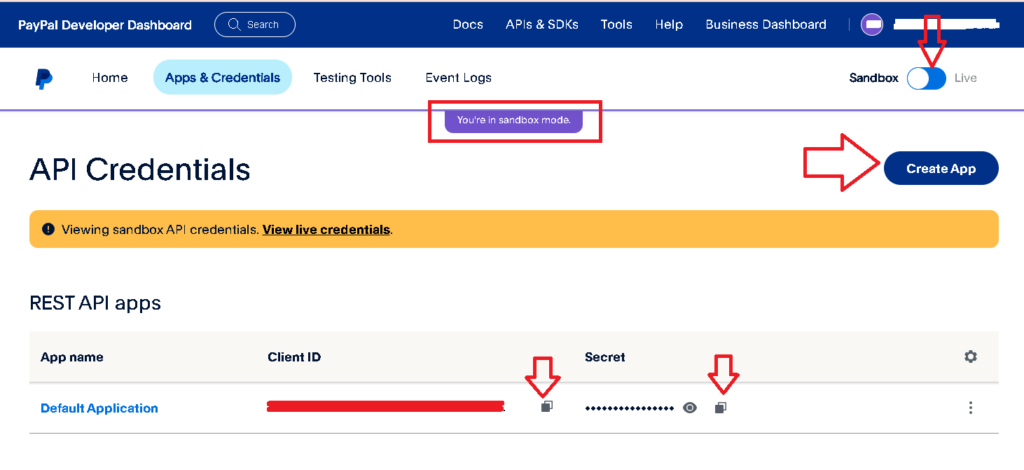
The second section will toggle between Paypal and Stripe Checkout Settings, depending on the payment gateway you selected in the first section. For this blog post, we will be using PayPal Checkout as the preferred payment gateway. This is where you set your sandbox and production’s merchant IDs and client and secret IDs. You can extract all this information from your PayPal account under the Developer’s tab or use this link optionally (https://developer.paypal.com/). Go to the Apps & Credentials tab and click the Create App button. Copy the Client ID and Secret ID using the copy buttons as shown and paste them on the appropriate fields.
To find your PayPal Merchant ID:
- Log in to your PayPal Account.
- Click the Settings icon on the top right.
- Select “Account Settings”.
- On the left column, under “Business Profile”, click “Business information”.
- The Paypal Merchant ID should show on the right page.
NOTE: I did not have the need to create a separate sandbox PayPal account. I have used the same Live Merchant ID for the sandbox Merchant ID, and successfully tested transactions in both the sandbox and live accounts.
7. The licenses tab is where you will need to enter the license keys if you have purchased any premium add-ons.
8. The Logs tab shows the processing or any error information.
How to test the Donation Form
In order to test the donation form in the sandbox mode, you will need to create test accounts. PayPal provides some default test accounts to use, but you may also create your own. Here are the steps:
- Log in to your PayPal account.
- Go to the PayPal Developer Dashboard.
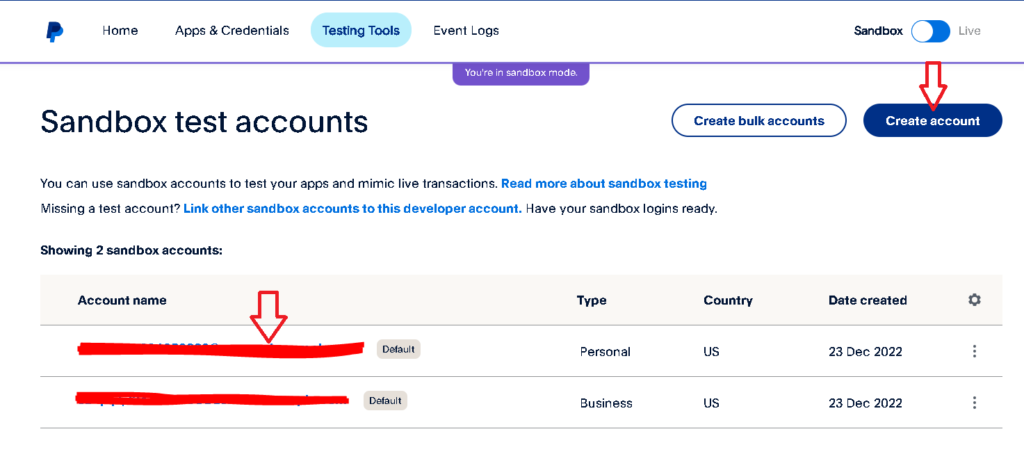
- Click the Testing Tools tab, and you will be presented with the following screenshot. Click one of the account names or create your own account by clicking on the Create account button on the top right.
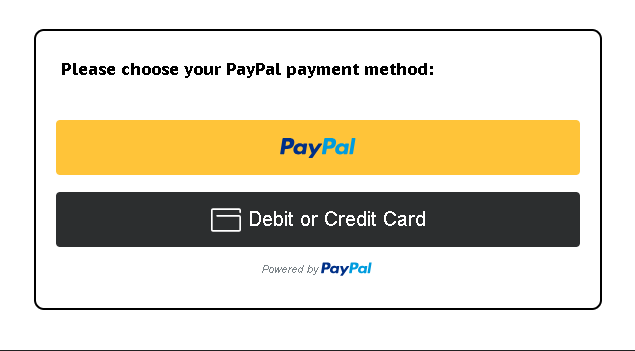
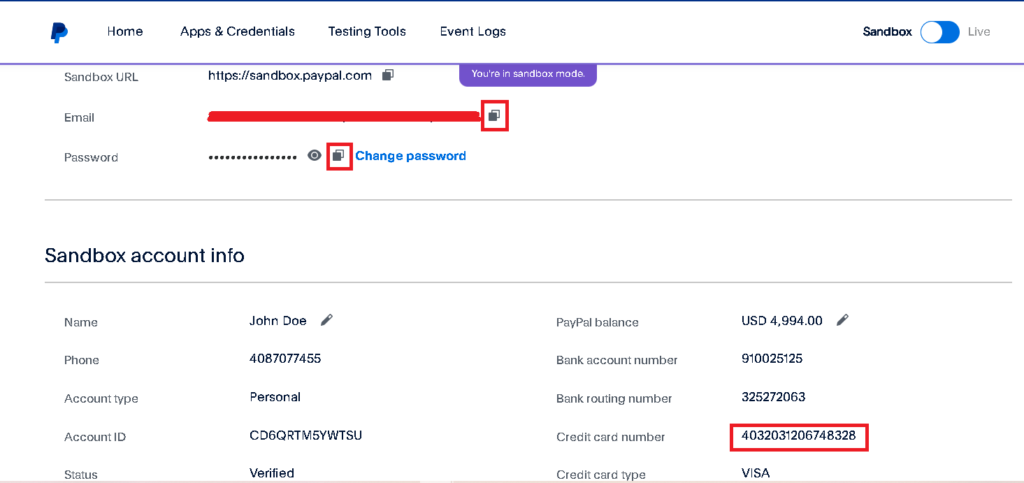
When you select PayPal as the preferred method of payment, copy and paste the email address and password on the PayPal Donation form and proceed to place the donation. If you select the Debit or Credit Card option, you may use the information here, such as the ‘Test’ credit card number and the expiration date. I had to make up a number for the 3-digit security code.
It is recommended that you also test in the Production/Live Mode to ensure everything is working as expected, but then you have to use a valid PayPal account and a credit card. I suggest doing a test donation of $1.00. It will also ensure that all email notifications are sent and received accordingly.
Conclusion
The Seamless Donations Plugin offers a valuable solution for simplifying the donation process. With its user-friendly interface, customization options, security features, and seamless integration with WordPress, it has become a go-to tool for those looking to raise funds for a cause.
If you’re considering starting a fundraising campaign or improving your current donation process, Seamless Donations Plugin is worth exploring. It empowers you to engage with donors effectively, increase conversion rates, and build lasting relationships while seamlessly integrating with your WordPress website.