PayPal For NonProfits: The Best Donation and Payment Tool

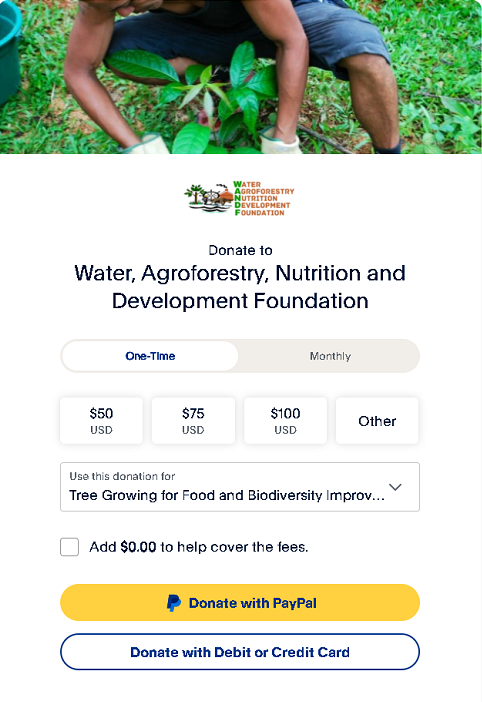
I have recently designed a new WordPress website for a small nonprofit in the Philippines (https://wandph.com). Unfortunately, they do not have the funds to purchase a premium donation plugin. Most of the free WordPress donation plugins I have come across do not include recurring donations, and if it does, they charge a steep platform fee.
So, I had to do my research to find the simplest and most economical solution that includes a recurring donation feature and a nice customizable donation form.
I discovered that PAYPAL DONATION is the answer.
I am writing this blog to educate nonprofits on how PayPal can benefit their business.
Here is an outline of the topics I will be discussing in this post.
What is PayPal
PayPal is a popular online and secure payment platform many people are familiar with and trust to make and send payments online, create invoices, and process e-commerce transactions, including donations. However, most people think they must have a PayPal account before purchasing or donating. PayPal can process all major credit and debit cards. Consumers or donors are not required to have a PayPal account unless they make a recurring donation.
It offers a wide range of features and tools to help nonprofits receive and manage donations and set up a donation page unique to their brand. Nonprofits may also create campaigns in which they can set a goal and track their progress. However, you must create or use a ‘Business’ PayPal account to make use of more advanced custom features. Using a Personal account offers limited options; as a nonprofit, signing up for a business account is highly recommended to take your business to the next level.
How much does PayPal charge for nonprofits
PayPal nonprofit business accounts pay a standard processing rate of 2.89% + $0.49 per donation for domestic transactions.
To register for PayPal as a nonprofit, you will need to provide the following information:
Organization Details
Bank Account Info
Account Holder Details
How to avail of the nonprofit discounted transaction fee
However, PayPal has a nonprofit program that offers discounted transaction fees for registered 501(c)(3) organizations. It charges a 1.99% transaction fee plus a fixed fee of $0.49. That is a good amount of savings for your organization, plus you will not have to worry about paying an additional Platform Fee per transaction as with other premium Donation Platforms or Plugins.
But for your organization to qualify, PayPal must confirm your nonprofit status. To start with, you can apply by editing your business information in your Account Settings page to ‘Non-profit’ as the Business type.
As a 501(c)(3) charity, you’ll need the following pieces of information to confirm your account belongs to your charity.
- EIN number
- Estimated volume of monthly transactions
- Bank statement PDF linked to your PayPal account
How to implement the PayPal Donate Button on your website
There are a couple of ways to do this. The first is through installing a WordPress PayPal Donation plugin. You will find several PayPal donation form plugins that are free and available for download, but unfortunately, I did find the features lacking. So, as a developer for over 20 years, I decided to implement the PayPal Donate button without using a plugin. However, if you are comfortable editing the functions.php file of your website’s child’s theme, you will have no trouble following the implementation I will discuss next.
There are two parts to this implementation. The first part is creating the donation page on the PayPal website, which will generate some javascript code at the end. The second part is adding these PayPal donation scripts to your website’s child theme’s functions.php file mentioned earlier and adding some HTML code snippets to a page, header, or footer. Make sure you are not editing the parent theme’s functions.php file, or your changes will get overridden once an update is done on the parent theme.
Part 1 – Steps to creating the PayPal Donate Button
Creating custom campaigns
Creating a campaign for fundraising is another great feature offered by PayPal for nonprofits and charities. The process for creating the campaign is similar to creating a button, and the implementation on the website is pretty much the same. You can create as many campaigns as you would like.
- Log in to your PayPal account and click the “Pay and Get Paid” tab on the menu.
- Under the Accept payments section, click on the “Donations” link.
- Select “Customize a button.”
- Select a button style from one of the following options:
- “Use PayPal button style” to use Paypal’s traditional yellow donate button.
- “Use your own button style” and upload your custom button image.
- Set the option to upload your brand/company logo.
- Set the option to add an image to your donation page by uploading a background image.
- Set the option to add an inspiring message or compelling description to your donation page.
- Select how you want to display your donation page.
- Full page experience – You’ll get an HTML code to copy and paste on your website. A page will open on a new tab when donors click your button. This is a much simpler implementation as this will not require touching the functions.php file.
- Pop-up experience – The donation page will appear as a pop-up window on your website. This option requires some Javascript and Php knowledge, and I will discuss this in the next section.
- Set up the currency for the donation amount.
- Set up specific donation amounts to offer.
- Set up recurring donations.
- Set up the option to give donors the option to cover processing fees.
- Set up a maximum of 10 programs that allow donors to choose a specific program for their donation.
- Set the option to allow the donors to add an optional note with their donation.
- Set the option to receive donors’ mailing addresses to send thank you notes.
- Set the option to take the donors back to your website.
- Click the Finish button to complete the setup.
Customizing the Donate Button Image
After uploading your custom donate button in Step #4, option 2, you will still need to do a bit of CSS styling to resize the image button back to its original size. By default, PayPal resizes it much bigger than your uploaded image size. To address this issue, add this CSS style to your website:
img#donate-button {
width: 160px;
height: 50px;
object-fit: contain;
}
Part 2 – Steps to adding the HTML code snippet and scripts into your website using the pop-up experience
After finishing the setup of your donation page on the first part, you will be redirected to a page and presented with two sections. The first is a Shareable Link, which you can use to share on social media, blogs, emails, etc.
But for this implementation, we will focus on the second section, the Donate Button.
- You will see an instruction to copy the entire code, but you will only need to copy the first two lines with the div tags and the last closing div tag. We will work on copying the script tags later in Step 8.
- Log in to your WordPress website and add an HTML widget to a page, header, or footer area where you want the PayPal donate button to appear.
- Paste the code into an HTML widget. Do this for every PayPal button you want to add to your website.
- For each PayPal button you add, make sure to append a unique number at the end of each div id tag (e.g., <div id=”donate-button2″></div>). Otherwise, the buttons will not show on the page.
- Go to Appearance > Theme File Editor, and select the Child Theme to edit from the dropdown. You also have the option to download and upload the file via the hosting’s File Manager. The functions.php file is found in wp-content/themes/name_of_child_theme
- Click on the functions.php file to edit and add the below code.
add_action( ‘wp_footer’, ‘addPaypalDonateScripts’, 20 ) - Copy the script tags (from the 3rd line down to the end of the script tag, excluding the last div tag).
- Create the function here and paste the script tags copied in step 8 inside the function. See Figure 1.0 for the complete code.
- Click the Update File button to save the changes.
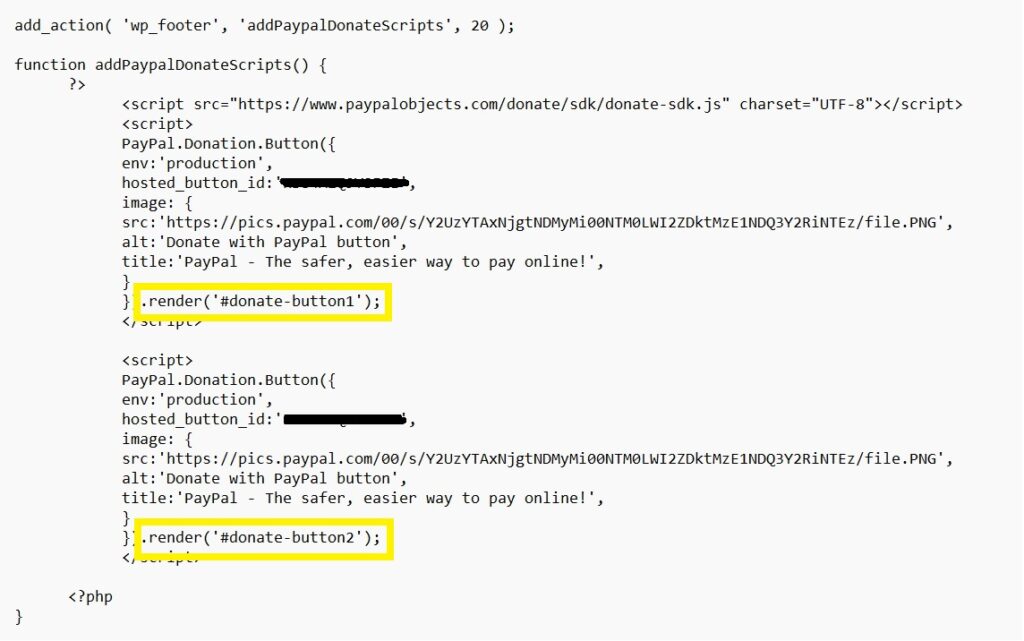
Figure 1.0
Optionally, you may use a code snippet plugin such as WPCode to add these scripts to the footer section, if you are more comfortable using this, and are not using a child theme.
NOTE: You can also find the details of this implementation on PayPal’s developer website
Wrapping Up
In conclusion, PayPal is a simple, secure, and cost-efficient donation and payment processing tool for starting nonprofit organizations or charities, with its easily customizable donation forms and campaigns. In addition, nonprofits can maximize their revenue with no additional platform fees and discounted transaction fees for verified nonprofits.
But eventually, as your donors and campaigns increase in number, you will need a more robust system to track all your projects, campaigns, donations, etc., in one location and be able to generate or run analytics reports. In this case, a donor management system might be the right solution for you.